Deep Learning With GPUs and Spark on Google Cloud
What is Dataproc?
‘Dataproc’ is the name for a google cloud service for creating, and managing a hadoop/spark cluster in the cloud. Google cloud offers this service for automatically configuring and provisioning a set of cloud compute instances, and configures them so that they work together as a spark/hadoop cluster. The benefit of using this kind of service is that we as data scientists don’t need to focus on how to configure or manage a spark cluster. We can simply use google to create a totally managed cluster for us that we can just start using. Google documentation about dataproc can be found here: https://cloud.google.com/dataproc/docs/quickstarts.
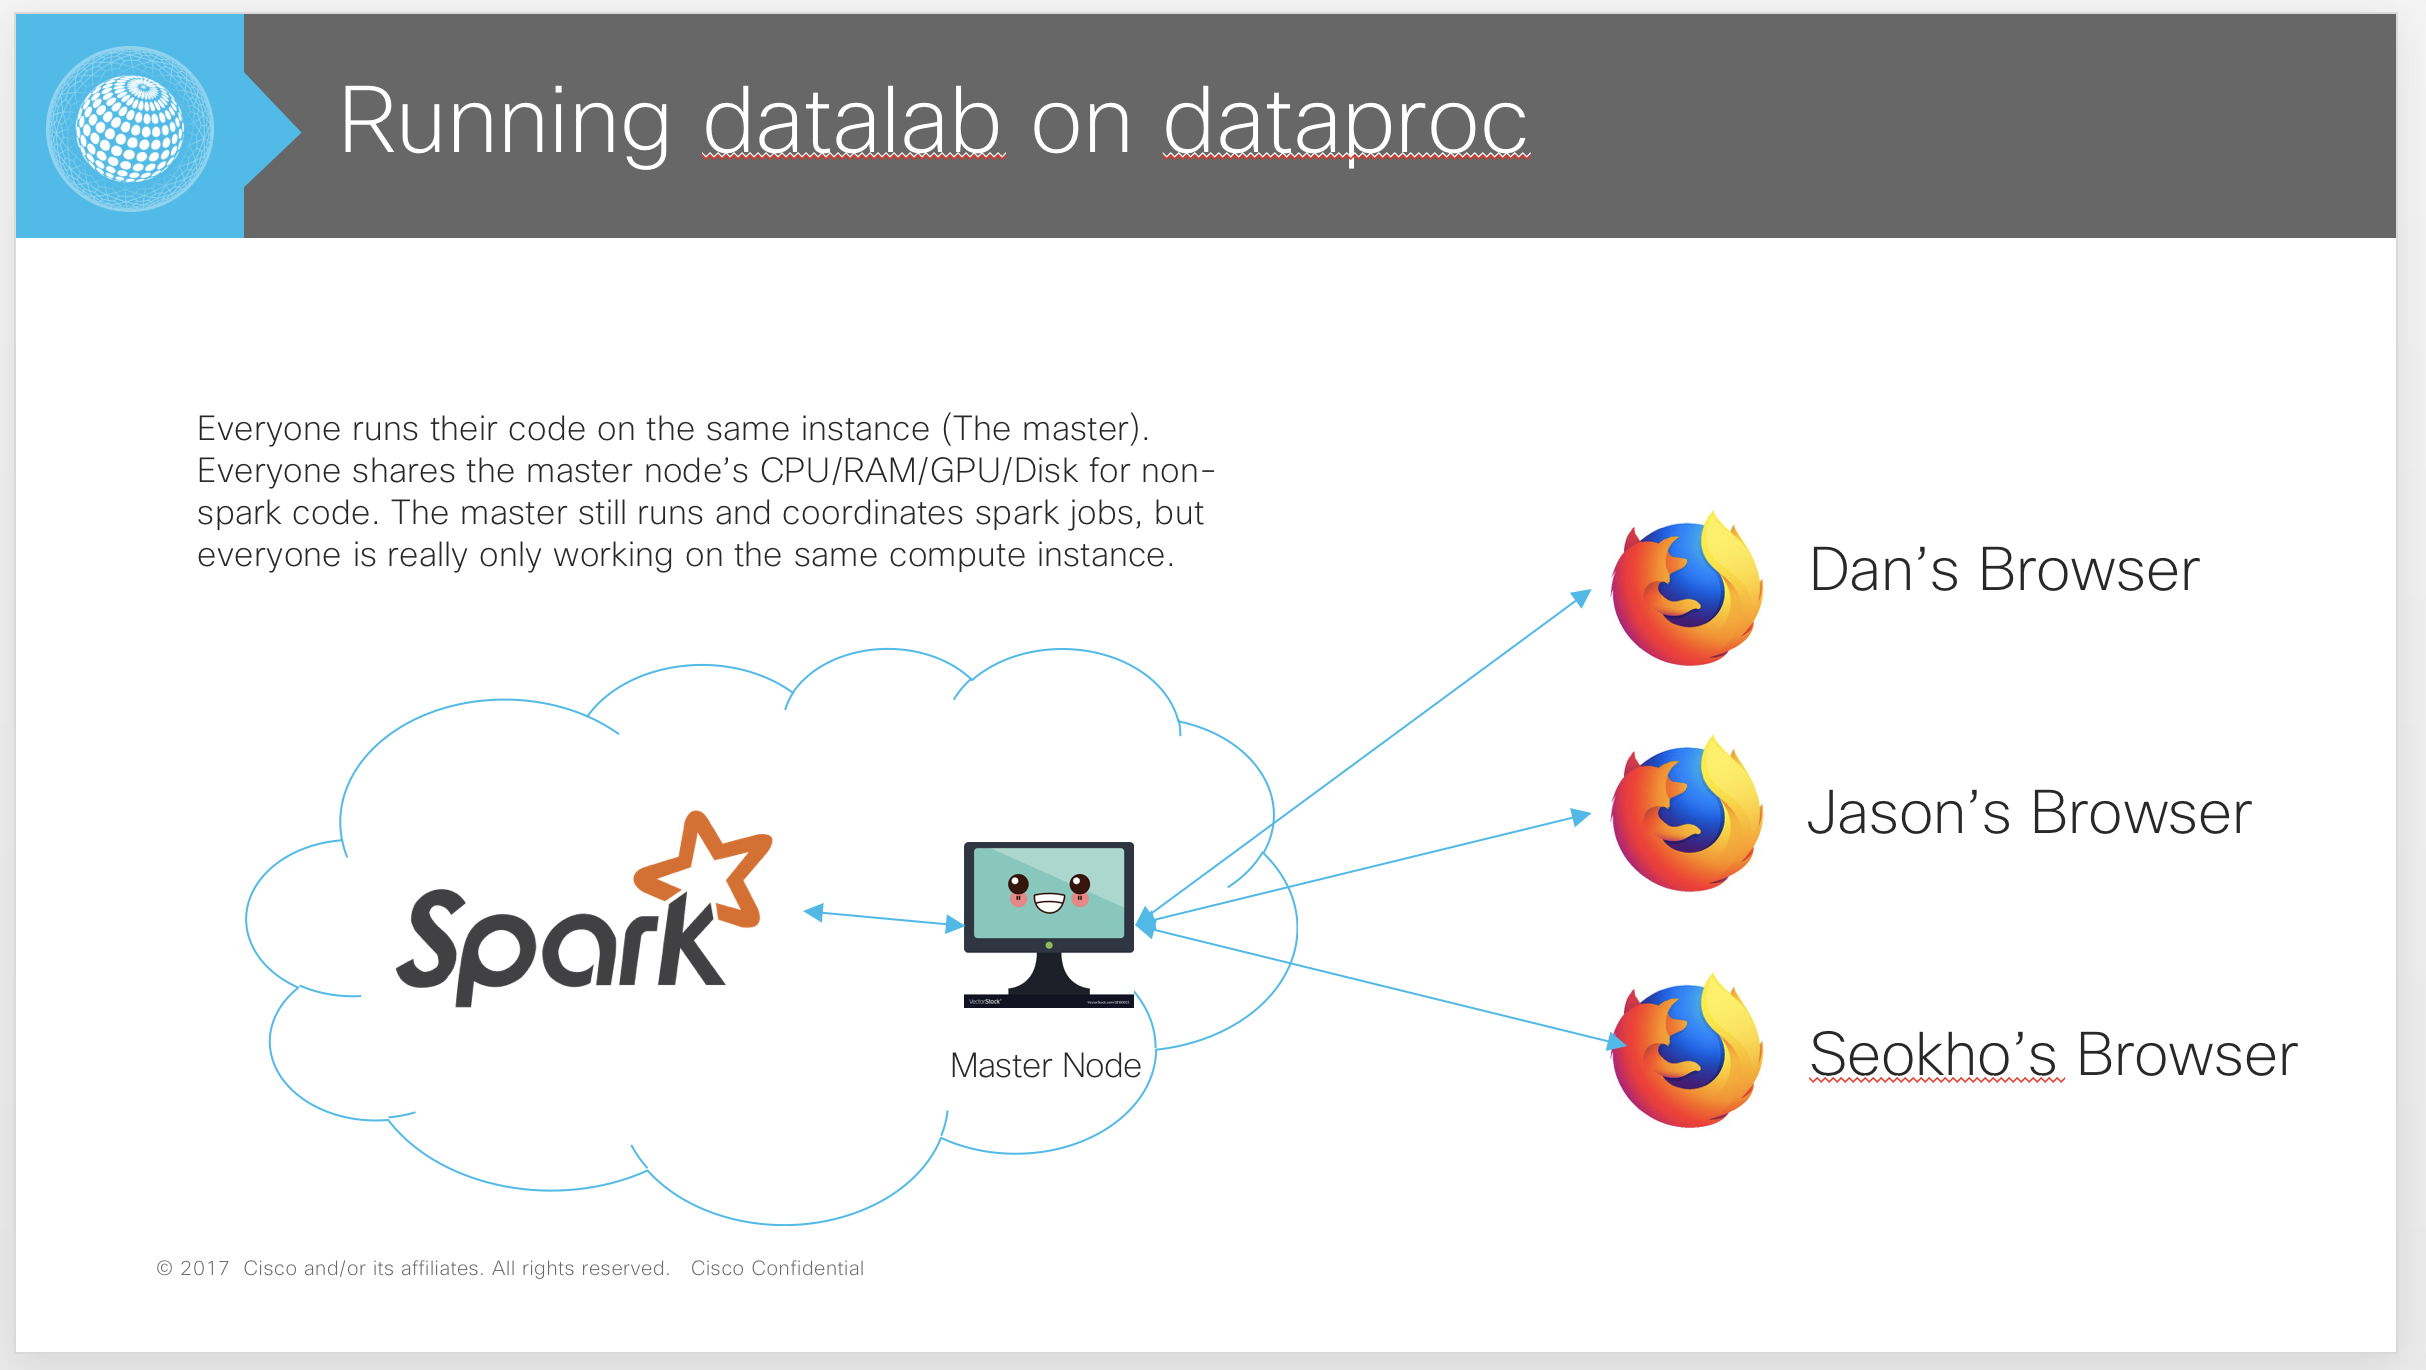
The way we use Dataproc is very special. Our team aims to share the same Dataproc cluster for most of our spark jobs. There are 3 different ways in which we can do this. One is to connect to Dataproc remotely (from some other google cloud compute instance), and to run spark jobs. The other two methods require a user to ssh into the ‘master node’ of the Dataproc cluster (A cluster has one master, and many workers. The master is where spark jobs are run and managed), and running code from there. In this method, all team members must share the same master node (Which is why we call it the Fat Master Approach, because everyone shares CPUs/GPUs/RAM for non spark portions of their code). For each of these methods (which we describe below), we have special configuration scripts (which can be seen being referenced in the cluster creation commands).
What are the ways we use Dataproc?
- Dataproc with ‘Datalab’ running on the master, with multiple GPUs (Fat Master Approach)
- Dataproc with ‘Jupyter’ running on the master, with multiple GPUs (Fat Master Approach, but with Jupyter intead of Datalab)
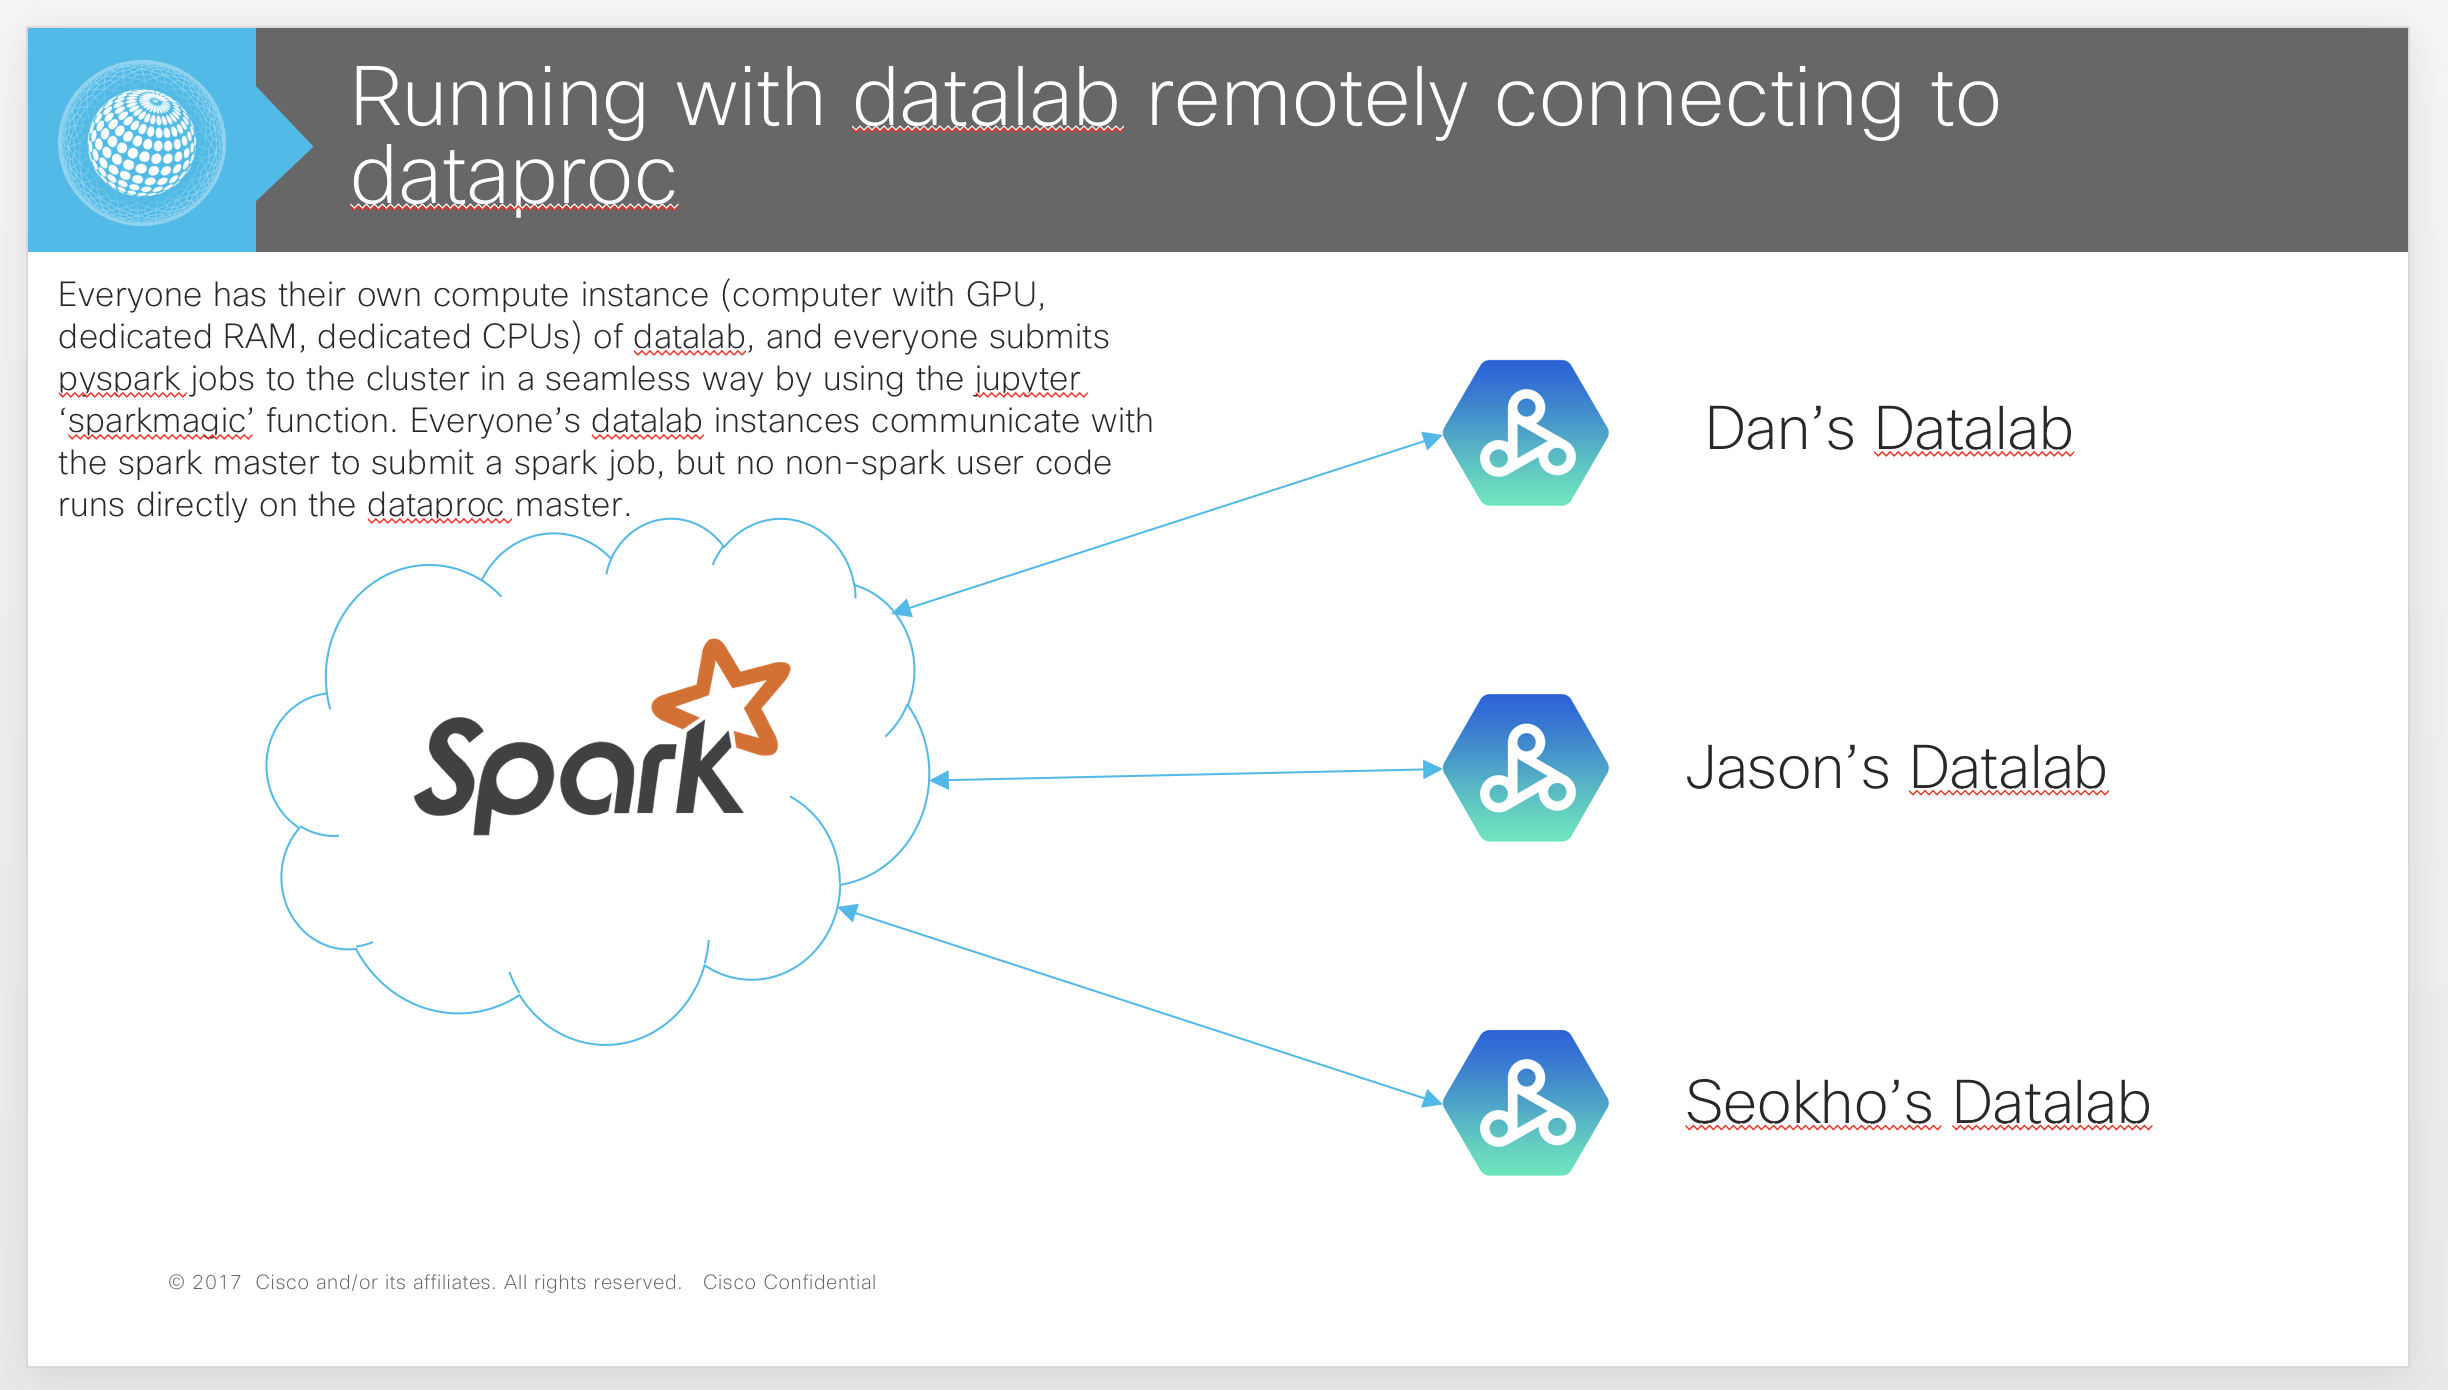
- Dataproc with ‘livy’ running on the master, where users create separate machines running ‘Datalab’ instances and submit spark jobs to the cluster remotely. (Thin Master Approach)
Dataproc Descriptions
Method 1
In this approach, a GPU is connected to the master node of the spark cluster, and the dataproc docker container is run on the master node. Users remotely connect to the master, and then run their respective code on the master node. Thus, this is called a ‘Fat Master’ approach because the master of the spark cluster has a large amount of resources, along with attached GPUs so that Spark and Deep Learning GPU based models and frameworks can be used simultaneously. A diagram of the method is provided below.

Method 2
This method is effectively the same as method 1, but instead of dataproc being run on the instance, jupyter is run instead.
Method 3
In this approach, an independent Datalab with its own connected GPU is created. This instance runs on its own, separate GCE instance outside of the Dataproc spark cluster. The Datalab instance connects to the Dataproc spark cluster master remotely by using the hosted ‘livy’ spark server (generated by an initialization script), and the ‘spark magic’ jupyter notebook package. Thus, this is called a ‘Thin Master’ approach because spark code is scheduled and run on the remote Dataproc cluster, while any GPU and local python code is run in the Datalab instance. A diagram of the method is provided below.

What are the specific commands we use to create/use Dataproc?
Method 1 (from above section on ways we use Dataproc):
Custom script steps for creating a dataproc/datalab cluster with attached GPUs:
- Use a modified google ‘datalab’ for dataproc initialization script.
- Install Nvidia drivers on node.
- Install nvidia-docker and modfiy initializaiton script to use the ‘–runtime=nvidia’ option.
Steps to Create And Connect to the Cluster:
- Command to create instance: Note here that we have custom initialization scripts for installing GPU drivers in the datalab GCE instance, installing nvidia-docker, and running the datalab docker image in nvidia-docker.
gcloud beta dataproc clusters create spark-cluster \
--bucket vm_space \
--subnet default \
--zone us-central1-a \
--master-machine-type n1-highmem-8 \
--master-boot-disk-size 50 \
--master-min-cpu-platform "Intel Skylake" \
--worker-min-cpu-platform "Intel Skylake" \
--num-workers 2 \
--num-preemptible-workers 4 \
--worker-machine-type n1-highmem-64 \
--worker-boot-disk-size 200 \
--preemptible-worker-boot-disk-size 200 \
--image-version 1.3 \
--project gvs-cs-cisco \
--metadata CONDA_PACKAGES="python==3.5 nltk numpy scikit-learn keras",MY_PY2_PACKAGES="tensorflow-gpu==1.8.0 keras",MY_PY3_PACKAGES="tensorflow-gpu==1.8.0 keras nltk gensim scikit-learn" \
--initialization-actions 'gs://dataproc-initialization-actions/conda/bootstrap-conda.sh,gs://dataproc-initialization-actions/livy/livy.sh,gs://dataproc-initialization-actions/conda/install-conda-env.sh,gs://vm_init_scripts/hseokho-datalab-gpu.sh,gs://vm_init_scripts/hseokho-configs.sh' \
--scopes cloud-platform \
--master-accelerator type=nvidia-tesla-v100 \
--properties "\
yarn:yarn.scheduler.minimum-allocation-vcores=4,\
capacity-scheduler:yarn.scheduler.capacity.resource-calculator=org.apache.hadoop.yarn.util.resource.DominantResourceCalculator,\
spark:spark.dynamicAllocation.enabled=true,\
spark:spark.dynamicAllocation.executorIdleTimeout=5m,\
spark:spark.dynamicAllocation.cachedExecutorIdleTimeout=1h,\
spark:spark.dynamicAllocation.initExecutors=10,\
spark:spark.dynamicAllocation.maxExecutors=500,\
spark:spark.dynamicAllocation.minExecutors=1,\
spark:spark.dynamicAllocation.schedulerBacklogTimeout=1s,\
spark:spark.driver.memory=40g,\
spark:spark.executor.instances=80,\
spark:spark.executor.memory=18g,\
spark:spark.executor.cores=4,\
spark:spark.task.maxFailures=4,\
spark:spark.driver.maxResultSize=8g"
- Connect to the instance with an ssh tunnel and ‘SOCKS’ proxy server:
(In one terminal window, run)
gcloud compute ssh --ssh-flag="-D" --ssh-flag="10000" --zone="us-central1-a" "spark-cluster-m"
- Connect to the datalab instance (running in a docker instance on the dataproc master node) thorough your local browser (This command is for MacOs). The basic idea is that in step 2 you created an ssh connection to your cluster, and started a socks proxy locally. This command opens your web browser and tells it to route all webpage requests to the socks server running locally, and pipe them through the ssh terminal to the master node:
"/Applications/Google Chrome.app/Contents/MacOS/Google Chrome" "http://spark-cluster-m:8080" \
--proxy-server="socks5://127.0.0.1:10000" \
--host-resolver-rules="MAP * 0.0.0.0 , EXCLUDE localhost" \
--user-data-dir=/tmp/spark-cluster-m
Method 2 (from above section on ways we use Dataproc):
Note that most of this process requires the creator to ssh into the instance, and run many commands themselves (commands that are already bundled together in the dataproc initialization scripts for Method 1).
- Create the instance through the google cloud console, or the command line:
(With GPU attached to MASTER only)
gcloud beta dataproc clusters create spark-jupyter-cluster \ --bucket vm_space \ --subnet default \ --zone us-central1-a \ --master-machine-type n1-standard-4 \ --master-boot-disk-size 500 \ --num-workers 2 \ --worker-machine-type n1-standard-4 \ --worker-boot-disk-size 500 \ --image-version 1.2 \ --project gvs-cs-cisco \ --initialization-actions 'gs://dan-test-bucket/notebooks/create-my-cluster.sh,gs://dataproc-initialization-actions/jupyter/jupyter.sh' \ --master-accelerator type=nvidia-tesla-k80 - SSH into the instance, and run/install the NVIDIA GPU drivers. (install_gpu_drivers.sh): (Run from the command line on the instance to install nvidia drivers, cuda, cudnn)
# INSTALL NVIDIA DRIVERS
# Note: The driver install script, CUDA install script, and cuDNN library .tgz file
# were all directly downloaded from the Nvidia website, and were specified as
# being for K-80 GPUs, on the 'Generic Linux 64 bit' operating system. More detailed
# Instructions for how to install the following packages can be found at
# These links: (Cuda install: https://docs.nvidia.com/cuda/cuda-installation-guide-linux/index.html)
# (CuDNN install: https://docs.nvidia.com/deeplearning/sdk/cudnn-install/index.html)

sudo apt-get update
sudo apt-get install -y linux-headers-$(uname -r)
gsutil cp gs://dan-test-bucket/notebooks/NVIDIA-Linux-x86_64-384.145.run .
chmod a+rwx NVIDIA-Linux-x86_64-384.145.run
sudo ./NVIDIA-Linux-x86_64-384.145.run -a -s

# INSTALL CUDA 9.0
gsutil cp gs://dan-test-bucket/notebooks/cuda_9.0.176_384.81_linux.run .
chmod a+rwx cuda_9.0.176_384.81_linux.run
sudo ./cuda_9.0.176_384.81_linux.run --silent
export PATH=/usr/local/cuda-9.0/bin${PATH:+:${PATH}}
export LD_LIBRARY_PATH=/usr/local/cuda-9.0/lib64${LD_LIBRARY_PATH:+:${LD_LIBRARY_PATH}}

# INSTALL cuDNN 7.3
gsutil cp gs://dan-test-bucket/notebooks/cudnn-9.0-linux-x64-v7.3.1.20.tgz .
tar -xzvf cudnn-9.0-linux-x64-v7.3.1.20.tgz
sudo cp cuda/include/cudnn.h /usr/local/cuda/include
sudo cp cuda/lib64/libcudnn* /usr/local/cuda/lib64
sudo chmod a+r /usr/local/cuda/include/cudnn.h /usr/local/cuda/lib64/libcudnn*
3) Start a SOCKS server locally, that routes commands to the instance:
gcloud compute ssh --ssh-flag="-D" --ssh-flag="10000" --zone="us-central1-a" "spark-jupyter-cluster-m
4) Open google chrome, and direct it to use the locally running socks proxy. (I’ve included two commands because it depends on the port you are running your jupyter notebook off of. It may not be 8080 for jupyter as it is for dataproc): (For Mac)
"/Applications/Google Chrome.app/Contents/MacOS/Google Chrome" "http://spark-jupyter-cluster:8123" \
--proxy-server="socks5://localhost:10000" \
--host-resolver-rules="MAP * 0.0.0.0 , EXCLUDE localhost" \
--user-data-dir=/tmp/ \
--incognito
"/Applications/Google Chrome.app/Contents/MacOS/Google Chrome" "http://spark-jupyter-cluster:8080" \
--proxy-server="socks5://localhost:10000" \
--host-resolver-rules="MAP * 0.0.0.0 , EXCLUDE localhost" \
--user-data-dir=/tmp/ \
--incognito
Method 3 (from above section on ways we use Dataproc):
- Create the DATAPROC cluster with ‘livy’ installed so spark jobs (Note, this is just the cluster): (NOTE: You must ALLOW http/https traffic to the master node)
MoreNotes:
- https://github.com/jupyter-incubator/sparkmagic/blob/master/examples/Magics%20in%20IPython%20Kernel.ipynb
- https://github.com/jupyter-incubator/sparkmagic/blob/master/examples/Pyspark%20Kernel.ipynb
- https://github.com/jupyter-incubator/sparkmagic
- https://github.com/GoogleCloudPlatform/dataproc-initialization-actions/tree/master/livy
gcloud dataproc clusters create spark-livy-cluster \
--bucket dan-test-bucket \
--subnet default \
--zone us-central1-a \
--master-machine-type n1-standard-4 \
--master-boot-disk-size 500 \
--num-workers 2 \
--worker-machine-type n1-standard-4 \
--worker-boot-disk-size 500 \
--image-version 1.2 \
--project gvs-cs-cisco \
--initialization-actions gs://dataproc-initialization-actions/livy/livy.sh \
--metadata 'MINICONDA_VERSION=latest' \
--scopes cloud-platform \
--properties "\
dataproc:alpha.autoscaling.enabled=true,\
dataproc:alpha.autoscaling.primary.max_workers=100,\
dataproc:alpha.autoscaling.secondary.max_workers=100,\
dataproc:alpha.autoscaling.cooldown_period=10m,\
dataproc:alpha.autoscaling.scale_up.factor=0.05,\
dataproc:alpha.autoscaling.graceful_decommission_timeout=1h"
- Create a separate GPU enabled DATALAB instance (Note this is a separate machine from the cluster):
datalab --zone us-central1-a beta create-gpu my-datalab \ --no-backups \ --accelerator-count 1 \ --machine-type n1-standard-4 \ --idle-timeout 1d \ --no-backups \ --network-name default - Connect to the datalab instance, and open the instance in your local browser at ‘http://localhost:8081’:
datalab connect my-datalab --no-user-checking
<Then open your local web browser to http://localhost:8081>
- SSH into the datalab instance
: ``` gcloud compute --project gvs-cs-cisco ssh --zone us-central1-a my-datalab
This lists the running docker containers
docker ps
docker exec -it
4. Connect to the running docker instance and install keras and 'sparkmagic':
 * pip install keras
 * conda install sparkmagic
 * If you want to install from the jupyter notebook, run the following
Install a conda package in the current Jupyter kernel
import sys !conda install –yes –prefix {sys.prefix} sparkmagic
Install a pip package in the current Jupyter kernel
import sys !{sys.executable} -m pip install keras ```
- Setup the connection to the spark dataproc cluster:
- Enable http/https on the dataproc cluster
- Run the ‘sparkmagic’ spark manager.
- Create a new endpoint ‘http://spark-livy-cluster-m:8998’ with ‘No auth’
- Create a new session with the specified endpoint
- Add ‘%%spark’ to any spark related code you want run on the cluster.
Some other notes:
Some important notes to share:
- GCP does not actually have weaker cores than our Hadoop. With this config, GCP outperforms our Hadoop per-core. Two factors contributing to the previously incorrect benchmarking:
- Having many smaller nodes is substantially slower than having a few big nodes. This should be because there’s less shuffling over the network and more shuffling in memory (haven’t verified this) but I think it’s actually because we get entire sets of 20+ core CPUs rather than partial CPUs. I don’t really know, if someone can test and better understand this, I’d be much obliged (I’m curious).
- You can specify which generation of Intel Xeon processors we get… for free. The config below specifies Skylake, which is the best possible, but you can’t set it for preemptible nodes so they’re Sandy Bridges. I don’t think this massively impacts performance though.
- Please add pre-emptible nodes instead of worker nodes to increase cluster size: preemptibles are 1/4th the cost and has very little downside for what we do.
- GCP’s default docker initialization script has a bug (dataproc-initialization-actions/docker/docker.sh) which I’ve fixed in gs://vm_init_scripts/hseokho-docker.sh. This was causing nodes to fail to start, and prevented YARN from recognizing new nodes added to the cluster.
- Executor configs are 18gb/exec, 4cores/exec. This is the most similar config per-exec to the defaults (jupyter100, jupyter200) on Hadoop. To get jupyter100mem-equivalent specs, you need to use ultra memory nodes in addition to adjusting these params
- Driver memory is 40gb, but DataLab starts to get unstable around ~10GB memory used.
- GPUs need to be shared (currently 1 v100). I think cluster needs to be restarted to attach more. I recommend that for GPU-heavy tasks you just make your own cluster for now.